Hello android lovers, good morning
at this blog of tutorial for android i will give complete tutorial for custom rom on galaxy mini. but before we start you must prepare all the files neede, download the files below:
download ODIN
download TASS_v1.0.ops
clockworkmod recovery
for custom rom that you'll use you can search it up in google, in this tutorial i will use emanon v6
the advantage:
- Screen off animation can be arranged and macem-macem effect, can be random as well
- if use for internet connection and gaming will more smooth
- Random cool bootanimation, there are 4 on it
- Which already include kernel support until 806MHz overclock, with No frills cpu control.
- If use DSP manager, the sound from headset will sounds more smooth
- FM radio work (Wah bgt same ane miss the mini FM radio)
- Notif Widget button bar can be replaced as desired
- Smoothly with a2sd darktremor
- the 3D Gallery is not slow like CM7
- can use radio
- Removed stock apps
- Google apps that can be downloaded from the Market (Gmail, Voice Search, Youtube, and Quick Search) to ensure that you get the latest version and to save space
- Samsung apps (Quick Office, Software Updater, Samsung Market, Stock Clock Widget, Program Monitor Widget, Screen Capture Service, Home Screen Tips, and Social Hub)
- Swype (optional to re-install)
• Replaced stock apps
- Myfiles ==> File Manager (with root access File Manager > Settings > Root Explorer)
- Dual Clock and Clock Widget ==> From Galaxy Y
- Desk Clock ==> From CM7
- Live Wallpaper ==> From CM7 (modified by me)
- TouchWiz Launcher ==> From SGS (modified by me)
- Maps ==> Updated to 6.3.0
- Market ==> Google Play
• Modified stock apps
- Messaging ==> Removed recipient limit and SMS>MMS auto-conversion. Enabled skin chooser
- Camera ==> Enabled power key to take pictures
- Wallpapers ==> Replaced some wallpapers
- FM Radio ==> Removed Airplane mode restriction
download emanon v6 here
before you use this custom rom your galaxy mini must have base firmware at gingerbread 2.3.X, see the tutorial upgrade to gingerbread 2.3.4 on galaxy mini
this is the tutorial
1.INSTALL CLOCKWORKMOD RECOVERY
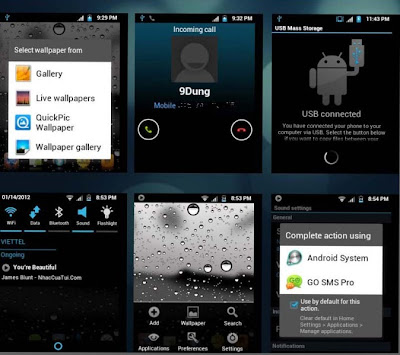
this is the screenshot of custom rom emanon V6

INSTALL CUSTOM ROM VIA CLOKWORKMOD
FINSIH :))
now you will have custom rom emanon v6 on your lil'G
see you in next tutorial for android
at this blog of tutorial for android i will give complete tutorial for custom rom on galaxy mini. but before we start you must prepare all the files neede, download the files below:
download ODIN
download TASS_v1.0.ops
clockworkmod recovery
for custom rom that you'll use you can search it up in google, in this tutorial i will use emanon v6
the advantage:
- Screen off animation can be arranged and macem-macem effect, can be random as well
- if use for internet connection and gaming will more smooth
- Random cool bootanimation, there are 4 on it
- Which already include kernel support until 806MHz overclock, with No frills cpu control.
- If use DSP manager, the sound from headset will sounds more smooth
- FM radio work (Wah bgt same ane miss the mini FM radio)
- Notif Widget button bar can be replaced as desired
- Smoothly with a2sd darktremor
- the 3D Gallery is not slow like CM7
- can use radio
- Removed stock apps
- Google apps that can be downloaded from the Market (Gmail, Voice Search, Youtube, and Quick Search) to ensure that you get the latest version and to save space
- Samsung apps (Quick Office, Software Updater, Samsung Market, Stock Clock Widget, Program Monitor Widget, Screen Capture Service, Home Screen Tips, and Social Hub)
- Swype (optional to re-install)
• Replaced stock apps
- Myfiles ==> File Manager (with root access File Manager > Settings > Root Explorer)
- Dual Clock and Clock Widget ==> From Galaxy Y
- Desk Clock ==> From CM7
- Live Wallpaper ==> From CM7 (modified by me)
- TouchWiz Launcher ==> From SGS (modified by me)
- Maps ==> Updated to 6.3.0
- Market ==> Google Play
• Modified stock apps
- Messaging ==> Removed recipient limit and SMS>MMS auto-conversion. Enabled skin chooser
- Camera ==> Enabled power key to take pictures
- Wallpapers ==> Replaced some wallpapers
- FM Radio ==> Removed Airplane mode restriction
download emanon v6 here
before you use this custom rom your galaxy mini must have base firmware at gingerbread 2.3.X, see the tutorial upgrade to gingerbread 2.3.4 on galaxy mini
this is the tutorial
1.INSTALL CLOCKWORKMOD RECOVERY
- extract all the file that you have download(use password:samsfirmware.com or sampro.pl if asked)
- The first turn on reboot mini galaxy in download mode (hold power button + volume (-) + center button)
- connect your galaxy mini to a PC via a USB
- open Odin multi downloader be sure port mini galaxy detected
- select the OPS file(tass_v1.0.ops)
- checked option one package
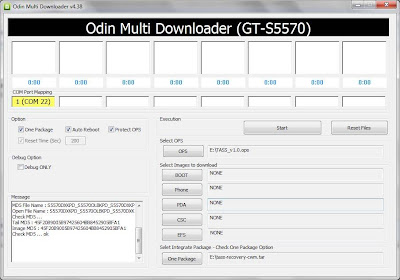
- select the option file that we will flash in column one package(the file clockworkmod recovery that you have download)
- press start and wait until the mini galaxy reboot and enter the home screen

this is the screenshot of custom rom emanon V6
INSTALL CUSTOM ROM VIA CLOKWORKMOD
- first make sure the file(emanon v6 that you have download) that will be installed already on the SD card root directory
- restart / reboot in recovery mode mini galaxy (hold power button + the center button)
- select "install zip from SD card"
- select "choose zip from SD card" (here select a custom ROM that will be installed : your emanon v6)
- select "YES - install update"
- select "wipe the cache partition"
- choose "wipe data - reset"
- pilih "reboot system now" and wait until the mini galaxy into the home screen
FINSIH :))
now you will have custom rom emanon v6 on your lil'G
see you in next tutorial for android
It's so great! I really love it!! Thnxs!! =D
ReplyDeleteyou're welcome :)
ReplyDeletedon't forget to like our FB fanspage :D