in this post of tutorial for android today i want so share tutorial how to root HTC Vivid. to root HTC Vivid you can use the Hasoon’s All-in-one toolkit. ok before i give the tutorial lets fist we know about the Hasoon’s All-in-one toolkit. it is a very usefull tools. the tool can flash using ClockworkMod Recovery, Unlock Bootloader using the official HTCDev site, flash Holicakes custom kernel or the stock kernel incase you messed up your rom and want to revert to stock rom.
screenshot:
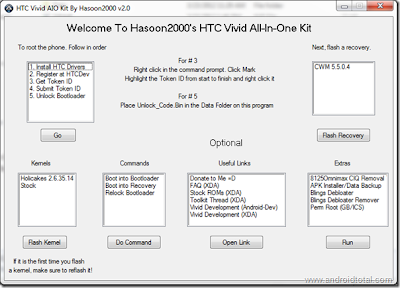
besides of the features above. it becomes easy to quickly boot your android phone into bootloader or recovery when the phone is connected to the computer via USB cable.
ok from the explanation above you should already know about Hasoon’s All-in-one toolkit. Now lets heading to the tutorial how to root htc vivid. but you must know by rooting the phone you will lost the warranty. Therefore, proceed only if you know what you are doing.

This is The Tutorial :
screenshot:
besides of the features above. it becomes easy to quickly boot your android phone into bootloader or recovery when the phone is connected to the computer via USB cable.
ok from the explanation above you should already know about Hasoon’s All-in-one toolkit. Now lets heading to the tutorial how to root htc vivid. but you must know by rooting the phone you will lost the warranty. Therefore, proceed only if you know what you are doing.

This is The Tutorial :
- Download the Required Files : Download Hasoon2000′s Vivid All-In-One Kit V2.1.
- extract the content of the downloaded file.
- from your HTC Vivid, Open Settings > Applications > Development and enable the USB debuggingmode.
- Then Connect your phone to your computer with USB cable then choose Charging mode.
- Run your Vivid 2.1 executable file(from your extraxted download file).
- If you do not have the HTC drivers installed on your PC/Laptop, select Install HTC Drivers and then click Go.
- If you have been unlocked your HTC Vivid’s bootloader by using the official HTCDev site, you can avoid this step.
Otherwise, select Register at HTCDev, hit Go which will fire up the browser and open’s the HTCDev site. Complete registration there. - Select Get Token ID and click Go.
- then you will see a command prompt where TOKEN ID will appear. Right-click on Command Prompt and select Mark. Then drag / Token ID block and right click to copy the ID token. Then Close the command prompt window.
- Select Submit Token ID and click Go.
- Then go to the HTCDev site. Scroll down to the bottom of the page paste the Token ID in the box provided. You will get email with a link to download the Unlock_code.bin file. Copy it to the data folder in the extracted Hasoon’s AIO Kit.
- Select Unlock Bootloader and hit Go.
- The phone will boot into hboot and in few seconds the bootloader will get unlocked.
- Now it’s time to flash ClockworkMod Recovery 5.5.0.4. To do that, select CWM5.5.0.4 in the Hasoon’s AIO Toolkit and hit Flash Recovery.
- Now let us get your HTC Vivid permanently rooted. To do that, select Perm Root (GB/ICS) in the Extras section and click Run.
FINISH :))
now you have the super user acces, now you can install all application what you want. Enjoy :)
ok, that's it tutorial how to root HTC Vivid. See you next time in anp
Comments
Post a Comment