good morning All :). Today I will give a tutorial on how to create a partition on SD Card especially for Galaxy Mini, but don't worry it also can be used for another device because it is generally used the same way to make partition for the hard drives on all android device. In this tutorial, we will make 2 pieces of partitions, one for storage of SD card (FAT / FAT32) and one for applications storage that would increase the smartphone internal memory space (Ext2).
Important! You must do it! Backup (copy) all of the contents of your SD Card into your computer's hard drive before you create a partition on your SD card, because when you create a partition it is directly will format your sd card, so that it will caused your data on SD card will be lost.
In general, a partition on the sd card is made of 3 pieces the fat32 partition, ext2, and linux swap.
Fat32 is useful for storing data like song mp3, video, images, documents, and others. Ext2 is useful for applications where installed, ext2 may be regarded as a second internal memory, now ext2 partition is used when we are going to move the applications on the internal memory to the sd card by force. This transfer must use the link2sd application that can be installed when the smartphone has been at the root Androidmu.
Linux swap partition itself is used to help the performance of RAM. This partition is used when your android smartphone has a small RAM.
another tutorial. read how to format sd card on windows.
Step by step tutorial how to create partition on SD card is:
- Download MiniTool Partition Wizard - Free HOME here.
- Install the software.
- Unplug / remove the SD Card from you android Smartphone, and insert the SD card into the Memory Card Reader, and then plug the Memory Card Reader to the computer.
- Open The MiniTool Partition Wizard Home Edition that you have downloaded before.
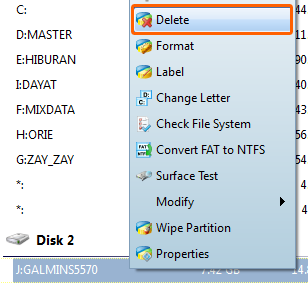
- Find the name of your SD Card, usually on Disk 2. in this case I have GALMINS5570(look the picture below), with 7.42GB capacity (8GB).

- If you have found it, right click the drive name of your SD card >> Delete.
- Right-click again >> Create Partition

- Settings as shown below, then click the OK button.

- For number 3, just change according to size that you want. In the picture is unallocated Space After: 835.79 MB that means that the future internal memory my smartphone will increase to 835.79 MB + 180 MB (default) = 1 Giga .
- Yap .. The first partition is created. Now right-click the drive with symbol *: under the drive's the first partition that you created earlier >> right click and click Create
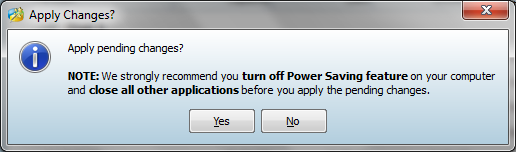
- Then Click Apply button
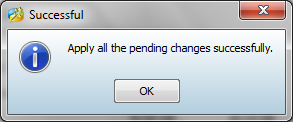
Then will appear box like the picture below - wait until the process complete, see the picture below
- Click OK, and your SD card now have 2 pieces of Partition! Then close MiniTool program Partition Wizard Home Edition and then copy back all the contents of your SD card that you have backup on your pc/laptop. : D
 then will appear an option box, Just Click Yes set the parameter according to the following picture, then click the OK button.
 Choose Yes
You can link your installed apps to your second partition that you have make so your internal memory will not fulled with installed apps read on link2sd tutorial
OK Finish, now your internal memory will increase according to the size of your second partition that you have created. see you on next news and android tutorial updates.
Thank you very much for the tut :) you really helped, keep up the good work ;D
ReplyDeletethanx
ReplyDeletethanks!!! good job!
ReplyDeleteThanks a lot Bro, you really helped me.
ReplyDeleteThanks, man. I was just searching for "what a second partition was for" and learned that you can increase your Android's internal memory from doing just that. Thanks!
ReplyDeleteyou're welcome bro :D
ReplyDeleteGreat Job ! I was little apprehensive to do this myself. but this tutorial served a guide.
ReplyDeleteThanks !!!
Will this increase the ram?
ReplyDeleteno, it is only increase internal memory
ReplyDeleteVery Good! It's working fine on my galxy y. Thanks
ReplyDeleteThank you very much for the Tuto! Why did they make it so complicated at Samsung?
ReplyDeleteTHANK U VERY MUCH DAVIS.....
ReplyDeletehow to create 3rd parttion for swapper 2...plz reply
ReplyDeleteit's the same with fat32 or ext, you just need choose the swap type and specify the space
ReplyDeleteTks Davis! it was exacly what I was looking for.
ReplyDeleteKeep up the good work.
Cheers