Tutorial Create Swap Memory On Android Smartphone

Create Swap memory on Android Phone - For you that have hobbies tweaking your computer must be have familiar with swap memori. But here I will probably help a little bit to explain what the function swapper 2 for your android phone. Swapper2 is one of android application that can support the performance of your smartphone memory consumption, by taking memory support which is usually from sd card, then be supported or send to main memory to increase the performance of your android device when running an applications and others. Here's how to use it:

how to create android swap memori


How To Create Swap Memory On Android Phone


First | Using Partitions

  1. Download swapper2 from Play Store

  1. Do not open the Swapper2
  2. Connect your PC to use SDCard with Cardreader
  3. Create Partition into 2 partition with Mini Partition Tool. The format is:
    - Make it FAT32 Partition 1 Primary
    - Make Linux Swap Partition 2 Primary

    example:
    - I use 4GB SDCard
    - 1st Partition : FAT32 Primary 3.2GB
    - 2nd Partition: Linux Swap Primary 500MB
    (For more details on how to partition SD Card via Mini Tool Partition Wizard read Tutorial Partitioning SD card )
  4. Once partitioned, insert into your android device
  5. Login CWM menu / Xrecovery
  6. Wipe Cache Partition
  7. Turn on your debice and enter to swapper2
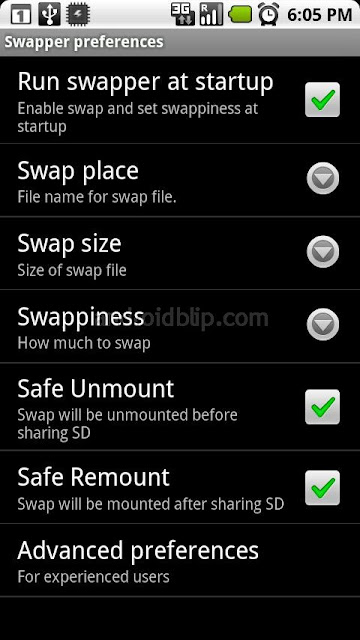
  8. go into the menu settings / preferences in the swapper. setingannya as follows:
    - Check Safe to Unmount
    - Check Safe to Remount
  9. On the menu go to Advance Preference preference and settings as follows:
    - Check the Use Swap Partition
    - Set a Swap Partition / dev/block/mmcblk0p2
  10. Back to main menu Swapper2
  11. And click the On button. Wait for the process is complete.


Second | Without Using Partition can't be more than 256mb:
  1. Open Swapper2
  2. Login on swapper2 preference menu
  3. Click on the Swap Size and choose what that will be swapped (32,48,64, etc)
  4. Back to the main menu and click Turn On Swapper2.


Ok thats for how to expanding you smartphone memory using swap memory. I hope this tutorial will help you to overcome the lack of memory on your smartphone. thanks for visting, see you in next android tips and tricks
Comments

Popular posts from this blog

How To Upgrade Samsung Galaxy Ace To Ice Cream Sandwich

today i will give tutorial upgrade samsung galaxy ace to Ice Cream Sandwich (ICS). We know that Samsung have been announced that there are no official update to android 4.0 for this device. But don't worry many developers from xda forum have found some ics rom for the device. And Today i will present on this article the most stable rom  the things that you must be concerned is : First, enable USB Debugging Mode in your mobile phone by go to Settings>Applications >Development > USB Debugging. then ticked that option Samsung Device Drivers installed on your computer. You must Have root acces to your device. see how to root galaxy ace Create a Nandroid Back before you flash your galaxy ace If you want to flash official firmware read flash official firmware on galaxy ace s5830 via odin Please note it is important to you to follow the following step, so you can do the process without any problem. For user experience you can read on comment area Download a...

How to Sync Android Contacts to Gmail With Easy Contact Sync

The synchronization and integration of services is one of the strengths of Android device if compared to his rivals. Any android application can used or combined with almost any other application or native service. Applications like Carbon Backup or Titanium Backup make use of backup copies of our device. But, what happens if what we want to synchronize are the contacts? in this case, in addition to the native option to Google (syncronize with Gmail), Don't worry, now you just can give thanks to a member of XDA developers, because they have invented  Easy Contact Sync app. The native Android sync is a wonder ; just enter our account on our device and voila! We have all our contacts synchronized and accessible from Gmail. Thus whenever we introduce ourselves in a new device, have our contacts there of form automagica . The problem is when we don't have our available Google account available (because we do not have internet connection at that moment or because we have lost t...

How to Flash Firmware To Galaxy S3 Via ODIN

If you are still confuse the step to change Operating system on your galaxy s3, here you can read complete tutorial how to flash firmware / ROM into your Samsung Galaxy S3 smartphone. Because Some visitor from this blog had asked me to give a very complete instruction. Flashing firmware actually not too difficult to do it. you just need to prepare the file needed, like ROM, Odin v 3.04, and thoroughness. I will also explain about some term on android that maybe you didn't know. What is PDA on Android ? PDA on android refers to the build version of the software/firmware. it means that PDA is the android operating system it self. What is Phone on android ? Phone on android refers to the baseband/modem version What is CSC on android ? CSC on android is the consumer software customisation and it is specific to the carriers and geographical region. It contains the software packages specific to that region, and also APN settings for you phone data connection, MMS etc for the serv...