
Easy Tutorial Flash Custom Kernel On XPERIA X8

After Yesterday i have posted tutorial unlock bootlader for Xperia X8 now today i will share how to flash kernel on Xperia X8. For you that maybe still confuse what is the purpuso of unlock bootloader and flash kernel i will give and short explanation. So if you have unlock bootloader it will allows you to flash custom kernel, and flash custom kernel will also allows you to install custom rom. because custom rom needs an specific kernel
se i can say that the sequence is :
unlock bootlader > flash custom kernel > flash cutom rom

READ FIRST

  • So for you that want to flash custom kernel you must unlock the bootloader first. Because if you don't unlock it your phone will be hard brick. so please be carefull and make sure you have unlock bootlader before flash kernel
  • every rom will use a special kernel / kernel itself. very important that you make sure the kernel what should be used every time you want to install custom rom that require kernel
  • I have do This Tutorial and i have succeded flash custom kernel with nAa-12 dan rom kuyadroid 4.5.4
  • Do with your own risk


How To Flash Custom Kernel on Xperia X8

  1. Download the latest version of flash tool. after download, install flash tool flash tool and then open the folder and go to the driver .. click to install and select the driver for your xperia x8.
    how to flash custom kernel xperia x8
  2. restart your computer
  3. After restart, open windows task manager by press ctrl+alt+del
  4. go to the process tab then find adb.exe, click then press end process
  5. Download File kernel that you will install, at this time i use nAa-12 kernel
  6. After download the kernel put the .ftf krenel file to foler flashtool > firmware
  7. Open flashtool.exe
    flash
  8. choose the version that match with your computer 32(86) bit or 64(64) bit
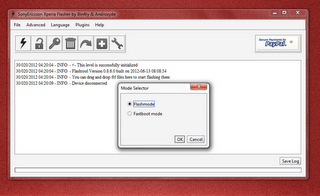
  9. choose the thunder arrow and select flashmodestep flash kernel
  10. make sure that you select the right kernel and on the  firmware content choose  kernel.sin
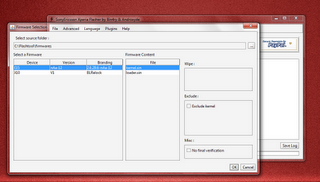
  11. Click Ok, then follow the instruction that appear
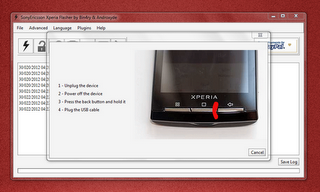
  12. turn off your phone by press the back button while beak usb cabel .. wait until your phone detected in flash tool.
  13. wait until the process finish
  14. after finished, reboot your phone then see on setting>about>kernel verison. you will see the kernel version that you have installed

Finish. That is for tutorial flash custom kernel for Xperia X8. see you in next post :)

Comments

Popular posts from this blog

The Kinds Of Android GPU

Hi all of tutorial for android blog reader. At This time I want to explain about the Graphics Processing Unit ( GPU on android ), which the brain of the graphics performance on our Android devices. GPU principle works with the Video Graphics Adapter (VGA) on PC / Computer. GPU principle works like the Video Graphics Adapter (VGA) on PC / Computer. GPU also plays an important role when we used to play Android games class 3D High Definition (HD) video or high quality. Well, for Teknokerz who often play games or graphics processing, this article can help you all about the GPU used on Android devices each. The following are the types of GPU installed for Android to help the performance of the CPU or the graphics processor in the process: Adreno GPU on Android Adreno GPU series is made ​​by the current ATI AMD subsidiary ATI imageon first referred to the series, circa 2002-2004 is the initial release of awa-series GPU's. In 2008, AMD imageon sold to one of the leading manufacturer

How to Sync Android Contacts to Gmail With Easy Contact Sync

The synchronization and integration of services is one of the strengths of Android device if compared to his rivals. Any android application can used or combined with almost any other application or native service. Applications like Carbon Backup or Titanium Backup make use of backup copies of our device. But, what happens if what we want to synchronize are the contacts? in this case, in addition to the native option to Google (syncronize with Gmail), Don't worry, now you just can give thanks to a member of XDA developers, because they have invented  Easy Contact Sync app. The native Android sync is a wonder ; just enter our account on our device and voila! We have all our contacts synchronized and accessible from Gmail. Thus whenever we introduce ourselves in a new device, have our contacts there of form automagica . The problem is when we don't have our available Google account available (because we do not have internet connection at that moment or because we have lost t

CONTACT

Contact Please use the provided contact-form to reach admin of tutorialfor-android. We will reply to your message within 24 hours as necessary. or you can manually send email to tutorialforandroid@gmail.com to reach us Name :(required) * Email :(required) * Subject : Message : <br /> &amp;amp;amp;amp;amp;amp;amp;amp;amp;amp;amp;amp;amp;amp;amp;amp;amp;amp;amp;lt;iframe src="https://www.google.com/recaptcha/api/noscript?k=6LchicQSAAAAAGksQmNaDZMw3aQITPqZEsX77lT9" height="300" width="500" frameborder="0"&amp;amp;amp;amp;amp;amp;amp;amp;amp;amp;amp;amp;amp;amp;amp;amp;amp;amp;amp;gt;&amp;amp;amp;amp;amp;amp;amp;amp;amp;amp;amp;amp;amp;amp;amp;amp;amp;amp;amp;lt;/iframe&amp;amp;amp;amp;amp;amp;amp;amp;amp;amp;amp;amp;amp;amp;amp;amp;amp;amp;amp;gt;&amp;amp;amp;amp;amp;amp;am