Thanks to hasoon toolkit, we can give you the news that the HTC One S smartphones, were already rooted. To root HTC One S devices now you can do it be only few simple steps, So you don't need to playing with ADB, or another terminal that can make you confuse if you are new in android customization
The rooting process had improved a lot in recent times, and turn away more and more days in which to have root permissions you had to manually modify the individual command lines. In particular, users who use HTC One's you will find a toolkit capable of doing much more than just a rooting your phone. This tool can make a recovery, edit controls, gain permanent root permissions and much more.
In this guide we will explain how to install and use the all-in-one hasoon2000
But before start the guide i will give some review about its phone software
HTC One S is equipped with Sense 4.0 is definitely the best graphic customization that you can find on an Android smartphone, thanks to the large amount of useful software that are inside, such as applying for the weather, one for financial measures or notebook with handwriting. Excellent reactivity of Polaris Office for the management of office documents. It also has a good panel for managing the phone while using in your car.
- A phone HTC One S
- A PC with Windows operating system
- WinRar, 7-Zip, or a similar utility to unzip files
- You have saved a backup of important data or have them transferred to the SD card
- A high battery level, ideally over the 60-70%
Installing hasoon 2000 toolkit for HTC One S
- Download the toolkit HTC all-in-one and then extract the files
- Open the directory and click One S.exe to launch the toolkit.
How To Root HTC One S
Unlock the bootloaderThe bootloader of the phone can be unlocked using the toolkit in a few simple steps.
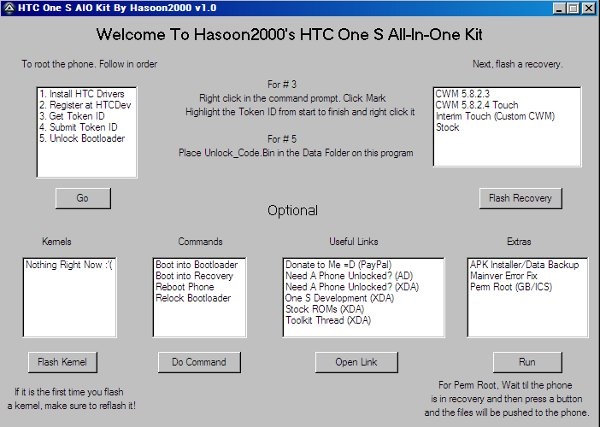
- To install HTC drivers click on Install Htc Drivers , and then click Go. the drivers will be installed automatically on your PC.
- Click on Register at HTCDev , and then click Go to register for an account on Htc's website Development. Create an account and login.
- Click Get ID Token to select Go. A prompt will appear that will show you the ID of your phone. Now make sure that your phone is connected to your computer.
- Using the Submit ID Tokens and Go by entering your ID to the HTC site Development. Make sure you are logged in to the site before clicking on this box.
- If all procedures were completed without errors, you can now unlock the bootloader using Unlock Bootloader and click Go.
Here is the preview of hasoon toolkit for htc one s

Start permanent root permissions
To obtain Root permissions on HTC device One S do the following:- Connect your HTC One S to your computer using a USB cable
- Launch the toolkit all-in-one HTC
- From Commands, choose Boot into Recovery and click Do Command. Wait for your device to reboot in recovery mode
- Under Extras, choose Perm Root (GB/ICS) and click Run
You now already have root permissions on the phone! If you are don't like to complex procedures but you want to explore yourself the potential of your HTC One S, this toolkit will save you a lot of time and frustration, allowing you to run the main processes related to rooting and recovery directly from a single screen.

Comments
Post a Comment